Virtual Receptionists
Integrations
Integrations: CRM, Marketing Software, and Ticketing Programs
Accept or Reject Incoming Call Transfer Requests in a Slack Channel
Accept or reject incoming call transfer requests in Microsoft Teams
Booking Appointments for Clients and Using Clio
Connect CASEpeer to Smith.ai Using Zapier
Connect Freshsales to Smith.ai Using Make
How to Automatically Forward Third-Party Leads via Email to Smith.ai for Outbound Calls
How to Connect Actionstep to Smith.ai
How to Connect Angi (Formerly Angie's List) Leads to Smith.ai for Outbound Calls (using Zapier)
How to Connect Assembly Neos to Smith.ai
How to Connect Daylite to Smith.ai
How to Connect HighLevel and Smith.ai
How to Connect HighLevel to Smith.ai for Outbound Calls
How to Connect HomeAdvisor Leads to Smith.ai for Outbound Calls
How to Connect Housecall Pro to Smith.ai
How to Connect Housecall Pro to Smith.ai for Appointment Booking
How to Connect Jobber Request Forms to Smith.ai
How to Connect Keap (formerly Infusionsoft) to Smith.ai
How to Connect LeadConnector and Smith.ai for Outreach Campaigns
How to Connect LiveCall to Smith.ai for Lead Follow-Up (Using Zapier)
How to Connect Ninja Forms to Smith.ai for Outbound Calling
How to Connect ServiceTitan to Smith.ai
How to Connect Smith.ai and AccuLynx
How to Connect Smith.ai and Act! using Zapier
How to Connect Smith.ai and Airtable using Make
How to Connect Smith.ai and Airtable using Zapier
How to Connect Smith.ai and Close CRM using Make
How to Connect Smith.ai and GorillaDesk using Zapier
How to Connect Smith.ai and Help Scout
How to Connect Smith.ai and Jobber using Zapier
How to Connect Smith.ai and Mailchimp
How to Connect Smith.ai and SharpSpring
How to Connect Smith.ai and noCRM using Make
How to Connect Smith.ai to Clio Calendar
How to Connect Smith.ai to Harmonizely
How to Connect Smith.ai to Jane
How to Connect Smith.ai to Mindbody
How to Connect Smith.ai to Woven (and Google Calendar)
How to Connect Smith.ai to Your LawConnect (formally LawTap) Account
How to Connect Smith.ai to your PracticePanther Intake Forms
How to Connect Smokeball to Smith.ai
How to Connect Your ActiveCampaign Account to Smith.ai
How to Connect Your Agile CRM Account to Smith.ai
How to Connect Your Capsule CRM account to Smith.ai
How to Connect Your ClientRock Account to Smith.ai
How to Connect Your Clio Grow Account to Smith.ai
How to Connect Your Clio Manage Account to Smith.ai
How to Connect Your HubSpot Account to Smith.ai
How to Connect Your Lawmatics Account to Smith.ai
How to Connect Your Lawmatics Calendar to Smith.ai
How to Connect Your Lead Docket Account to Smith.ai
How to Connect Your Lexicata Account to Smith.ai
How to Connect Your MyCase Account to Smith.ai
How to Connect Your Pipedrive Account to Smith.ai
How to Connect Your PracticePanther Account to Smith.ai
How to Connect Your Redtail CRM Account to Smith.ai
How to Connect Your Rocket Matter Account to Smith.ai
How to Connect Your Salesforce Account to Smith.ai
How to Connect Your Wealthbox Account to Smith.ai
How to Connect Zoho CRM to Smith.ai
How to Connect noCRM.io to Smith.ai
How to Connect your Ninja Forms Intake Forms to Smith.ai
How to Forward Calls from Talkroute to Smith.ai
How to Pass Call Tracking Data from Smith.ai to CRM
How to Pass REI Software Form Fills into Smith.ai for Outbound Calls
How to Send Calls from WhatConverts to Smith.ai
How to connect your Filevine account to Smith.ai
How to connect your GlossGenius scheduling link to your Smith.ai account
How to connect your Law Ruler account to Smith.ai
How to identify and track Smith.ai calls and chats in HubSpot
How to use Filevine with Smith.ai for lead capture, client intake, and appointment scheduling
How to use MyCase Intake Forms with Smith.ai
How to use Smith.ai with Dubsado
How to use Smith.ai with Lawcus intake forms
Requesting an integration
Using Smith.ai with RealEFlow
Outbound Calling
Enabling your business' caller ID for Smith.ai-placed calls
How To Trigger a Smith.ai Outbound Call Using PDFs with Docparser
How to Connect Thryv Leads to Smith.ai for Outbound Calling
Outbound Calling with Smith.ai: Getting Started
Requesting Outbound Call-Backs from Your Call Summary or Dashboard
Requesting an Outbound Call in the Dashboard
Set your schedule and preferences for outbound calls
Direct Transfers & Call Blocking
Adding Callers to Your Direct Transfer or Block List
Why can't I direct transfer or block this number?
Voicemail
How to Customize Your After-Hours Voicemail Greeting
How to Customize Your Spanish Voicemail Greeting
How to Update Your Voicemail Summary Destination(s)
How to record your own greetings (or have someone do it for you)
Notifications
How to Receive Call Summary Notifications via Email, SMS, or Slack
Integrating Smith.ai with Your Slack Team
What's the difference between post-call follow-up and transfer notifications?
Appointments & Scheduling
Adding Video Meetings to your Appointments
Calendaring Program Integrations
Connecting your Keap Calendar to Smith.ai
How to Adjust Your Time Zone Settings in AppointmentCore
How to Connect Jobber to Smith.ai Appointment Setting
How to Connect Smith.ai and MassageBook
How to Connect Smith.ai and Square Appointments
How to Connect Smith.ai to Apptoto
How to Connect Smith.ai to Calendly
How to Connect Smith.ai to Goldie
How to Connect Smith.ai to Google Calendar
How to Connect Smith.ai to HighLevel Calendar
How to Connect Smith.ai to Motion
How to Connect Smith.ai to Office 365 or Outlook with Microsoft Bookings
How to Connect Smith.ai to WellnessLiving
How to Connect Thryv to Smith.ai for Intake and Appointment Setting
How to Connect Timely to Smith.ai
How to Connect Your PracticePanther Calendar to Smith.ai
How to Connect Your ScheduleOnce Account to Smith.ai
How to Connect Your Schedulista Account to Smith.ai
How to Connect Your Setmore Account to Smith.ai
How to Connect Your WhenWorks Account to Smith.ai
How to Connect Your ZynCal Scheduling Assistant to Smith.ai
How to Connect Your iCloud (Apple) Calendar to Smith.ai
How to Find Your Acuity Scheduling Public Calendar Links
How to Lock Your Time Zone in Calendly
How to lock your time zone in Acuity/Squarespace
How to set up OnceHub to book appointments in your time zone
Preventing Calendly from Auto-Filling
Scheduling Appointments with MyCase & Smith.ai
Admin Support
Availability and Work Schedule
How to Change Your Smith.ai Referral Code
How to Text Smith.ai Support
How to ensure specific clients always reach a Spanish-speaking receptionist
How to provide existing client data to Smith.ai
How to provide lookup/reference data to Smith.ai
How to view your open tickets with Smith.ai
Opting In and Out of Monthly Quota Notifications
Recording & Converting/Preparing Audio for Pronunciation Ringtones
Requesting updates to your instructions
Using and Accessing the Smith.ai Call Dashboard
Why don't you have an online portal?
Call Routing & Transfers
Have All Your Calls Answered by Spanish-Speaking Bilingual Receptionists
How to Enable "Redirect" with SMS Commands
How to Receive Call Transfer Requests via Text Message (SMS)
How to Update Your Status via SMS (Text Message)
Pricing & Billing
How to Download an Invoice PDF
How to update billing details and business information
How to update your payment method or credit card for your Virtual Receptionist service
Where do I obtain Smith's W-9 information?
Why are add-ons "per-call?" Why should I pay for this on all calls?
Spam & Robocalls
Number Forwarding & Porting
Can I use my current business phone number with Smith.ai?
Enabling Caller ID for Google Voice
Enabling Caller ID for Vonage
Enabling Caller ID on Grasshopper
Enabling Caller ID on Mighty Call
Enabling the Caller ID in CallRail
How To Disable Call Screening on Grasshopper
How to Forward Calls From Your Mobile Phone
How to Forward Calls from 8x8 to Smith.ai
How to Forward Calls from Aircall
How to Forward Calls from Bandwidth to Smith.ai
How to Forward Calls from Dialpad to Smith.ai
How to Forward Calls from FreedomVoice
How to Forward Calls from Grasshopper to Smith.ai
How to Forward Calls from Law Ruler to Smith.ai
How to Forward Calls from Net2Phone to Smith.ai
How to Forward Calls from Phone.com to Smith.ai
How to Forward Calls from RingCentral to Smith.ai
How to Forward Calls from ServiceTitan to Smith.ai
How to Forward Calls from Vonage to Smith.ai
How to Forward Calls from Zoho Voice to Smith.ai
How to Forward Your Calls From Marchex to Smith.ai
How to Forward Your Google Voice Number to Smith.ai
How to Port Your Number from Ruby to Smith.ai
How to disable "Require me to press a key to accept a call" in eVoice
How to disable Call Screening for Xfinity
How to enable Caller ID for eVoice
How to forward calls from 3CX to Smith.ai
How to forward calls from 800.com to Smith.ai
How to forward calls from Comcast to Smith.ai
How to forward calls from Cox Business to Smith.ai
How to forward calls from GoToConnect to Smith.ai
How to forward calls from Intermedia to Smith.ai
How to forward calls from Microsoft Teams to Smith.ai
How to forward calls from Monster VoIP to Smith.ai
How to forward calls from Nextiva to Smith.ai
How to forward calls from Spectrum to Smith.ai
How to forward calls from Twilio to Smith.ai
How to forward calls from Unitel to Smith.ai
How to forward calls from Verizon Business to Smith.ai
How to forward calls from Windstream to Smith.ai
How to forward calls from Xfinity to Smith.ai
How to forward calls from eVoice to Smith.ai
How to forward your calls from CallRail to Smith.ai
How to forward your calls from Line2 to Smith
How to forward your calls from Voip.ms to Smith.ai
How to forward your calls from Zoom to Smith.ai
How to turn off Call Screening in Vonage
How to turn off the "On Play Announcement" in RingCentral
How to turn off the Verification Prompt in Dialpad
How to turn on Caller ID in Dialpad
How to turn on Caller ID in Ring Central
Porting Your Number to Smith.ai
Why We Need Caller ID
Payment Collection
How to Use CPACharge with Smith.ai Receptionists
How to Use Headnote to Collect Payments with Smith.ai
How to Use LawPay to Collect Payments with Smith.ai
How to use Authorize.net to store credit card information
Payment Software Integrations
Call Summaries
Guidelines to writing instructions for your virtual receptionists
How Do I Disable My Daily Call Summary Emails?
How long does it take to receive my call summaries?
How to See the Detailed Flow of Every Call
How to Update Your Daily Call Summary Destination(s)
How to Update Your Instant Call Summary Destination(s)
How to get call summaries in Microsoft Teams
Route Smith.ai Call Summaries to a Slack Channel
Smith.ai Call Summary and Email Destination Options
Understanding Your Daily Call Summary
Using Intake Forms with Your Smith.ai Service
Why are my SMS call summaries incomplete?
24/7 Call Answering / Receptionists FAQ
Adding Users to Your Virtual Receptionist Account
Best practices for Using CallRail with Smith.ai
Call Recording & Transcription with Smith.ai
Essential Plan: How to Update Your Account
How to CC or BCC Follow-Up Emails to Yourself
How to Connect CraftJack Leads to Smith.ai for Outbound Calls
How to Connect Your Lawcus CRM Account to Smith.ai
How to Export Your Smith.ai Call Data via CSV
How to Forward Calls From Ruby to Smith.ai
How to Have Smith.ai Receptionists Send Follow-up Texts and/or Emails to Your Callers
How to Send Retainer Agreements During Intake Calls
How to Set Up Extended and Custom Extended Intake
How to Use Smith.ai Receptionists for Lead Qualification & Client Intake
How to Use Smith.ai Tracking Numbers
How to View Follow-Up Messages in the Dashboard
How to edit your Team Directory
How to have Smith.ai receptionists check for conflicts
How to restart SMS call notifications
Terms and Definitions
The Basics
Why Does Porting a Phone Number Take So Long?
Outreach Campaigns
Formatting Recipient Data for Upload to Outreach Campaign
Generate an Outreach Campaigns Plan API Key
How to Automatically Add Facebook Ad Leads to Outreach Campaigns
How to Automatically Add Leads from LinkedIn Lead Gen Forms to Outreach Campaigns
How to Connect ActiveCampaign and Smith.ai for Outreach Campaigns Using Zapier
How to Connect ClickFunnels Classic and Smith.ai for Outreach Campaigns
How to Connect Contact Form 7 and Smith.ai for Outreach Campaigns
How to Connect CraftJack Leads to Smith.ai for Outreach Campaigns
How to Connect Follow Up Boss Leads to Smith.ai Outreach Campaigns
How to Connect HighLevel to Smith.ai for Outreach Campaigns
How to Connect HomeAdvisor Leads to Smith.ai Outreach Campaigns
How to Connect Marketo to Smith.ai Outreach Campaigns
How to Connect Nutshell CRM and Smith.ai for Outreach Campaigns
How to Connect Salesforce Marketing Cloud Account Engagement (Pardot) to Smith.ai Outreach Campaigns
How to Connect Unbounce and Smith.ai for Outreach Campaigns
How to Create a Web Form with Zapier and Connect it to Smith.ai
How to Get the ID of a Smith.ai Outreach Campaign
How to turn on instant call summary destinations for Outreach Campaign calls
Monitor the performance of your outreach call campaigns
Outreach Campaigns using local Caller ID
Passing additional data through your Outreach Campaign
Stop Calls or Remove a Recipient from a Campaign in the Dashboard
Chat
Installation & Web Host Options
Can I change the URL of the stand-alone chat widget?
Excluding your chat widget on certain pages of your website
How to Install your Chat Widget
How to Locate the URL of a Link-Based Chat Widget
Installing Smith.ai Chat (editing your own HTML)
Installing Smith.ai Chat on a GoDaddy Website
Installing Smith.ai Chat on a Google Sites Website
Installing Smith.ai Web Chat on a Lawlytics Website
Installing Smith.ai Web Chat on a Shopify Website
Installing Smith.ai Web Chat on a Squarespace Website
Installing Smith.ai Web Chat on a Webflow Website
Installing Smith.ai Web Chat on a Weebly Website
Installing Smith.ai Web Chat on a Wix Website
Installing Smith.ai Web Chat on a WordPress Website
Setting your chat widget on specific pages of your website
Why is my Chat widget displaying incorrectly?
Live Chat
Billing for Smith.ai Live Chat
How to Get Chat Notifications via Text Message
How to Use Smith.ai Live Chat
Request a Virtual Receptionist Call Request From Chat Transcript
Setting Up Receptionist Callback Requests in Live Chat
Setting up an Email to SMS Gateway with Smith.ai Live Chat
What's a "Relevant Chat?"
Integrations
How to Connect Smith.ai Chat to Law Ruler
How to Connect Your ActiveCampaign Account to Smith.ai Chat
How to Connect Your Capsule CRM Account to Smith.ai Chat
How to Connect Your Clio Grow Account to Smith.ai Chat
How to Connect Your HubSpot Account to Smith.ai Chat
How to Connect Your Lawmatics Account to Smith.ai Web Chat
How to Connect Your Lexicata Account to Smith.ai Chat
How to Connect Your PracticePanther Account to Smith.ai Chat
How to Connect Your Wealthbox Account to Smith.ai Chat
How to Connect your Clio Account to Smith.ai Chat
How to Connect your Lead Docket Account to Smith.ai Chat
How to Integrate Smith.ai Chat with Google Analytics/Google Ads using Google Tag Manager
How to Set Up Chat Call-Back Requests in Slack
How to connect Smith.ai Chat and Mailchimp
Route Smith.ai Chat Transcripts to a Slack Channel
Configuration & Setup
Add Legal Disclaimer to Your Chat Widget
Choose not to send transcripts to your chat visitors
Creating linked playbooks
Customize Your Chat Widget Greeting, Disclaimer, and Availability Messaging
How To Style Your Smith.ai Chat Widget
How to Change Live Chat Trigger Time
How to Set Up Smith.ai Chat Custom Intake Fields
How to Update Your Credit Card Information on the Chat Dashboard
Opting out of non-relevant transcript emails
Require a phone number to initiate Smith.ai chats
Set Custom Hours for Smith.ai Chat
Setting Your Notification Preferences for Web Chat
Adding your business information to your chat account
How to Export Your Smith.ai Chat Data via CSV
How to Review Chat History in Your Dashboard
How to Set Up Q&A
How to Set Up and Use Playbooks for Smith.ai Chat
How to Test your Chat, Q&A, and Playbooks
How to Update Your Contact Information on Your Smith.ai Chat Dashboard
How to add Q&A to your Smith.ai Chat
How to sign up for Chat
Send Smith.ai Chat Callback Requests to Slack
Using the Smith.ai Chat Playbook Funnel Performance Tracker
[LIVE DEMO] Smith.ai Chat: A Look Inside Our Chat Technology
Company
Smith.ai Partners
Channel Partner Logo Guidelines and Usage for Smith.ai Chat
How to Access & Use the Partners Portal
How to Access Invoices and Historical Billing in the Partner Portal
How to Change your Payment Method or Credit Card in the Partner Portal
How to Download Call and Chat Data From the Partner Portal
How to Pause & Resume an Account in the Partner Portal
How to Sign Up for Smith.ai Partner Payouts
The Smith.ai Partners Portal 1.0
Developer/API Resources
Zapier
Best Practices with Zapier
Can Smith.ai's Support Team help me set up my Zapier integration?
How much does a Zapier integration cost?
How to Automatically Add HubSpot Contacts to Outreach Campaigns
How to Connect Smith.ai Chat to Zapier
How to Connect Smith.ai's Virtual Receptionist Service to Zapier
How to Locate Your Zapier Webhooks URL
Initiate a Smith.ai Outreach Campaign Call with Zapier
Initiate an Outbound Call from Smith.ai when a New WPForm is Submitted using Zapier
Initiate an Outbound Virtual Receptionist call from Smith.ai when a New HubSpot Form is Submitted via Zapier
Which platforms does Zapier integrate with?
Make
Add Smith.ai calls as prospects to an Outreach.io Sequence
Best Practices with Make
How to Connect Angi Leads to Smith.ai for Outbound Calls (using Make)
How to connect Smith.ai to Make
How to send Smith.ai call summaries to Outreach.io
API
General
Converting/Preparing Audio for Voicemail & Greetings
Federal Holidays Observed by Smith.ai
How to convert Scientific Notation in a .CSV file
How to port your number from Vonage
Porting a number: Sideline
SMS/Text Notification for missed call transfers
Smith.ai Money-Back Guarantee FAQ
What is the Smith.ai Referral Program?
- All Categories
- Virtual Receptionists
- Integrations
- How to Connect Smith.ai and Airtable using Zapier
How to Connect Smith.ai and Airtable using Zapier
 Updated
by Tim Fischer
Updated
by Tim Fischer
Our Zapier integration helps business owners save tons of time by automating processes that have previously been manual. This guide will walk you through connecting Smith.ai and Airtable via Zapier. Using this guide, you can:
Prerequisites
To use our Zapier integration to connect Smith.ai and Airtable, you will need:
- A Zapier account
- A Smith.ai Virtual Receptionist account
- An Airtable account
Create a Record in Airtable after each new Smith.ai call
- Go to the Smith.ai + Airtable Zapier Integrations page.
- Select "New Call" as your trigger, "Create Record" as your Action, and click "Connect My Apps".
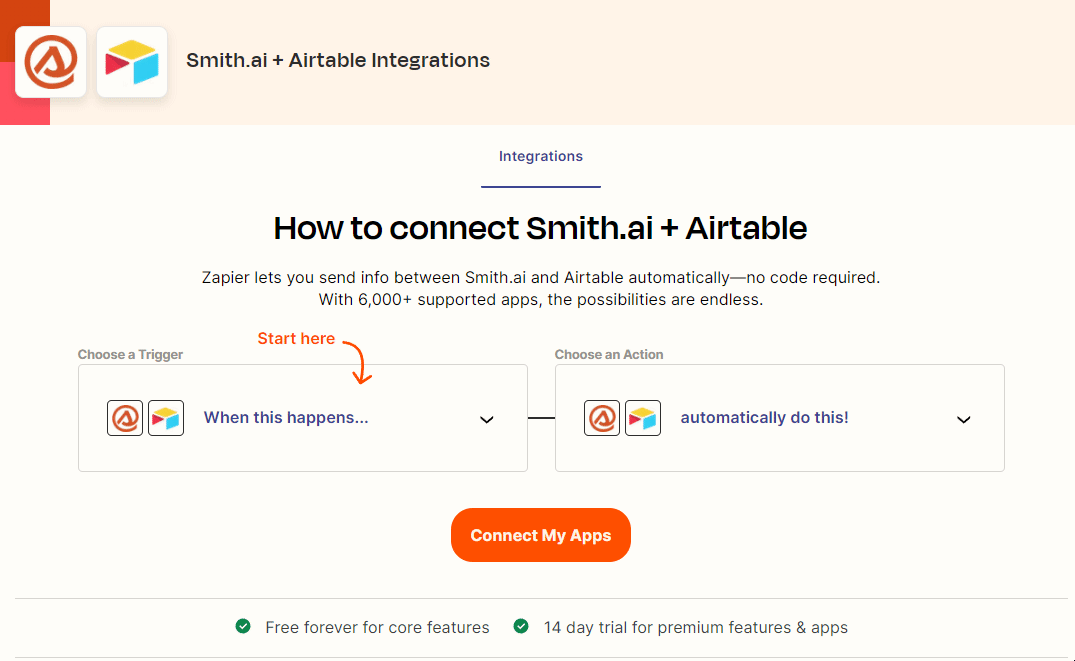
- Select "New Call" as your trigger, "Create Record" as your Action, and click "Connect My Apps".
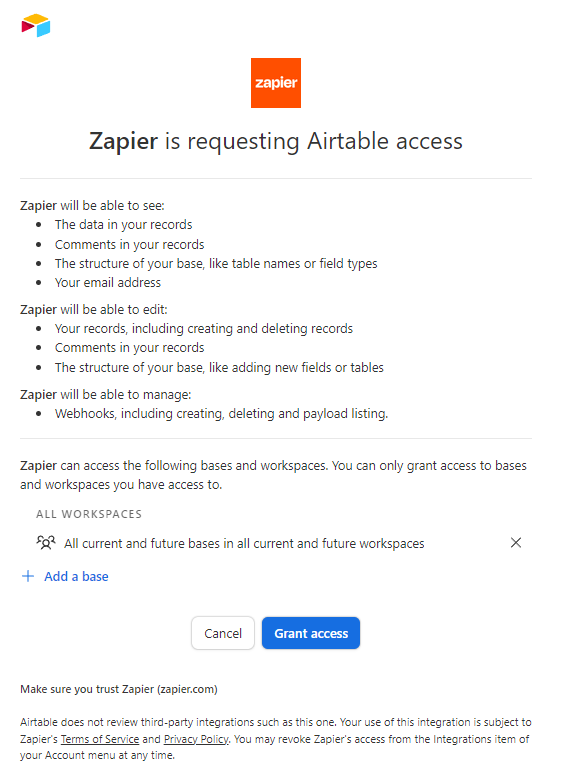
- Connect your Smith.ai Virtual Receptionist and Airtable accounts to your Zapier account by following the prompts.
- Connect Smith.ai. More information can be found here.
- Connect Airtable.
- Customize the Zap to meet your business needs. You can have any fields you would like, but to get started we recommend:
- Name
- Phone Number
- Notes (you can link the full call summary in this field)
Your Zap will have fields that match those of your Airtable base and table. They may differ from the screenshot below.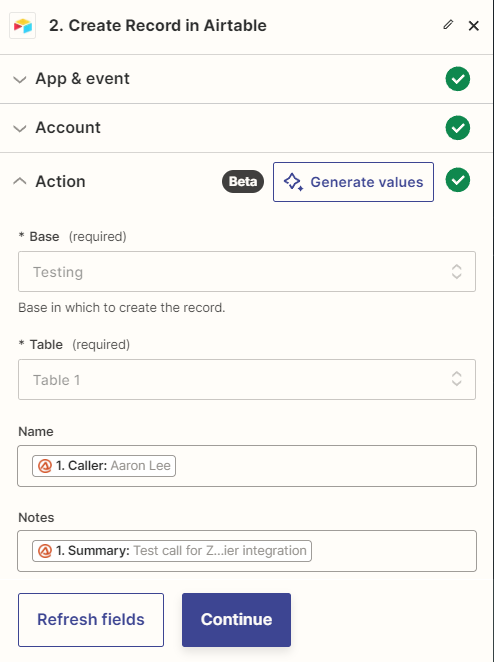
- Test the Zap.
- Name the Zap.
- Turn on the Zap.
Making a Custom Smith.ai and Airtable Zap
Keep your business operations running smoothly with a custom zap connecting Smith.ai and Airtable. Create custom automation by choosing triggers, actions, and searches.
- Sign up for a Zapier account for free. If you already have one, log in.
- Go to the Smith.ai + Airtable Zapier Integrations page.
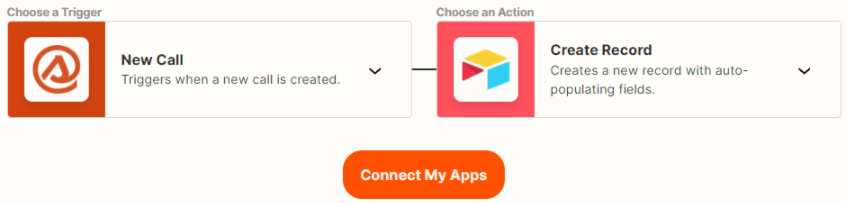
- Choose the action and trigger from the options displayed. In the example below, we've chosen New Call (Smith.ai) as the trigger and Create Record (Airtable) as the action. However, you can use any combination of triggers and actions that fit your business needs.
- Press the Connect My Apps button.Note: If you are not logged into Zapier, you will be prompted to do so.
- Connect your Smith.ai and Airtable accounts to your Zapier account by following the prompts.
- Connect Smith.ai. More information can be found here.
- Connect Airtable.

- Customize the Zap to meet your business needs.
- Test the Zap.
- Name the Zap.
- Turn on the Zap.
Additional Resources:
Questions? Contact us!
If you're already a Smith.ai client and need help, please email us at support@smith.ai or call us at (650) 727-6484 for assistance.
If you're not yet a Smith.ai client, please schedule a free consultation to get started with our virtual receptionist services or email us at sales@smith.ai. We'll help you select the best plan to match your business’s growth goals and budget.